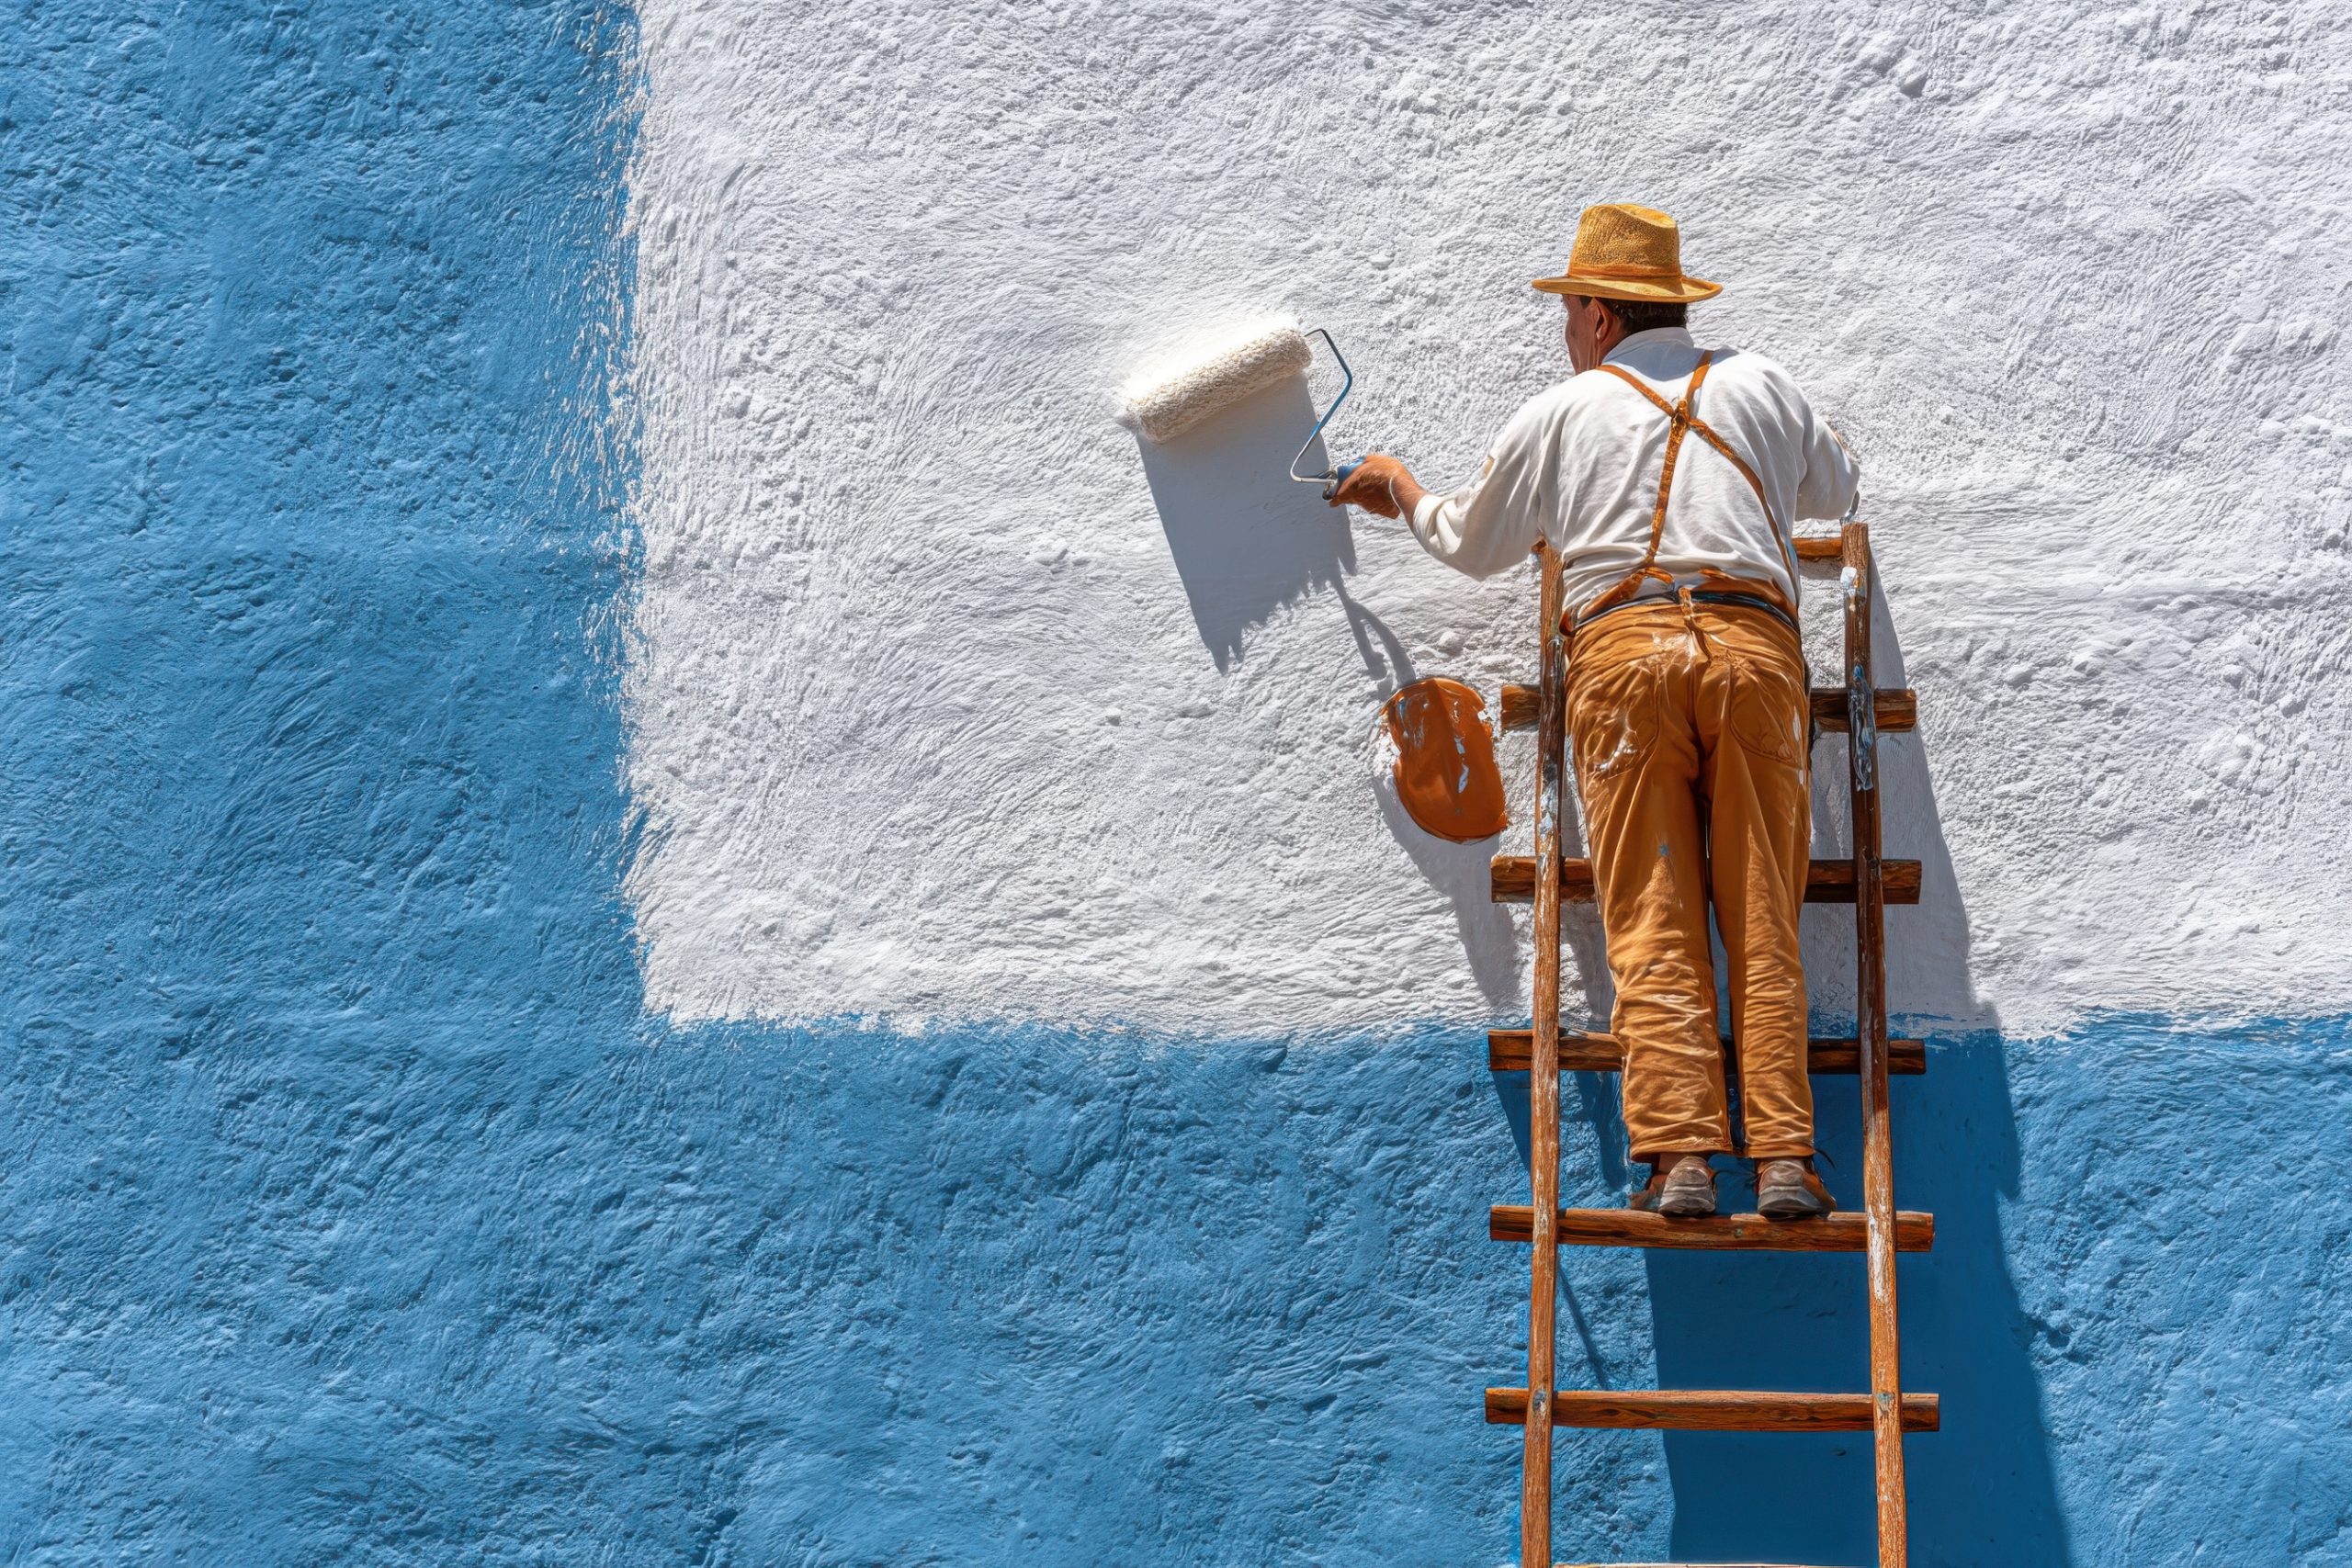
Ever thought a fresh coat could fix faded, cracked, or weathered siding without stripping it down?
Exterior paint does more than make your home look good. It protects it from sun, wind, and rain. Before painting over old paint, check the surface, pick quality products, and plan for prep work.
A good repaint needs cleaning, fixing damage, and sometimes primer and two coats of topcoat. If you’re painting a lighter shade, use a white undercoat or tinted primer to avoid old color showing through.

In South Africa, the climate affects painting. Summer heat, heavy rains, and humidity shape when and what to paint with. Cleaning, scraping, sanding, and priming decide if you can paint over or need to remove old paint.
Coatings last differently: wood siding needs attention every 3–7 years, stucco about 5–6 years, and brick can last 15–20 years. Remember, painting costs depend on size, condition, and any extra repairs needed for a lasting finish.
When painting over old exterior paint is a good idea
Before you start painting outside, check the surface first. A quick look can tell you if you can paint over the old paint or if you need to remove it. Small fixes and cleaning can often refresh a wall without stripping it all off.

Assessing the condition of the existing paint
Look for signs like loose paint, flaking, or blistering. Try a paint adhesion test by cutting an X, pressing tape over it, and pulling the tape. If paint comes off, the surface needs to be stripped before painting.
Also, check for moisture damage, wood rot, or rust. Even if the paint looks good, scrape away any loose areas. This ensures the new paint will stick well.
When you can paint over existing paint safely
If the paint is stuck well and looks good, you can paint over it. Use paint systems that match, like water-based over water-based or oil over oil. This helps avoid problems.
For similar colors, a light sand and wash might be enough. But if you’re changing paint types, use a primer. This helps the new paint stick better.
Don’t paint over areas with peeling paint. Scrape off the bad parts, prime, and then repaint. A paint adhesion test helps you know if you’re making the right choice.
Preparing previously painted exterior surfaces for repainting
Before you repaint, prepare the surfaces well. This ensures the new paint sticks and lasts. Start by cleaning, removing loose paint, and fixing any damage. These steps help avoid peeling and enhance the finish, even in coastal areas with salt spray and wind.

Cleaning and degreasing the exterior
First, clean the surface. Use pressure washing to get rid of dirt, dust, and salt from coastal homes. For tough grime or mould, mix warm water with a TSP substitute or sugar soap. Add one cup of bleach per gallon to fight mildew. Rinse well and let it dry before you proceed.
Scraping, sanding and removing loose paint
Then, scrape off any loose paint and flaking areas. Use metal or plastic scrapers for peeling and blistered spots. Sand the edges between bare substrate and existing paint with 50–80 grit to remove rough boundaries. For finish sanding on wood, switch to 180–280 grit and use a random orbital sander on larger areas.
For multiple thick layers, you might need to use thermal or chemical stripping. But remember, chemical strippers need safety gear and careful cleanup. Vacuum debris and wipe surfaces with a damp cloth after abrasive work.
Repairing damage and filling gaps
Look for rot, moisture damage, and rust stains. Replace rotten wood and treat exposed nail heads with a metal primer. Use a flexible exterior filler to fill cracks and holes and smooth over gaps. After priming problem areas, caulk joints around windows, doors, and trim to seal and prevent water ingress.
Cover plants, vehicles, and fixtures with drop cloths or plastic sheeting while you repair. Once dust cleanup is complete and surfaces are dry, you’ll be ready to prime and paint.
Primer: when you must prime and when you can skip it
Deciding to prime before painting can greatly affect your exterior project’s success. A good primer seals in porous surfaces, smooths out repairs, and ensures topcoats adhere well. Here’s how to know when to prime the whole wall and when spot priming is enough.

Reasons to apply a primer
Prime bare wood and other exposed surfaces to guard against moisture and tannin bleed. This makes the topcoat adhere better and last longer.
Use primer on rust-stained metal, masonry repairs, and areas with patching compound. It blocks stains and provides a uniform base for a consistent finish coat.
Don’t skip primer when switching paint types. Moving from latex to oil or vice versa requires a suitable primer to avoid adhesion failure. Tinted primer is handy for covering dark colors, reducing the need for multiple topcoats.
Situations where you can skip primer
If the surface is clean, sound, and already painted with the same type of paint, you might not need a separate primer. High-quality self-priming exterior paints work well for similar shades, allowing two coats without primer.
Spot priming is a good choice for older houses with localized repairs. Prime only the patches, plaster repairs, and bare areas instead of the whole wall. This saves time while ensuring adhesion and sealing where needed.
Remember, the decision to prime depends on the substrate and color change. Don’t skip primer when covering a lighter paint with a darker one, treating tannin-rich woods, or when metal or nail heads risk rust. In these cases, use a dedicated primer and follow product recommendations for the best results.
Choosing the right materials: paint, primer and tools for exterior surfaces
Choosing the right supplies is key for a durable exterior job in South Africa’s varied climate. Match your paint to the surface and local weather. For long-lasting protection, choose paint with UV resistance and mildew inhibitors.
Always read the paint manufacturer’s guidelines. This ensures the paint is right for exterior use. Follow their advice on primer and paint combinations.
Selecting high-quality exterior paint and coatings
Most siding and trim work well with acrylic latex paint. It sticks well to wood and fibre cement. For woods like cedar, use an oil-based primer and a quality paint topcoat.
For stucco or hairline-cracked surfaces, choose an elastomeric coating. It fills small gaps. Plan for two coats of paint for even coverage and durability. Use a tinted primer or basecoat for dark colours to save on finish coats.
Check product labels for UV resistance, mildew control, and recommended substrates. Brands like Dulux, Plascon, or Sikkens list these details. They help you compare coatings and their expected lifespan.
Tool choices: brush, roller or sprayer
Choose tools based on the surface and your skill. Use an angled sash brush for trim and details. Brushing is best for old wood and tight spots.
Rolling is good for flat siding, giving a thick, even coat. Spraying is fast but applies thin coats. It needs careful masking of windows and plants.
- Quality roller covers improve lay and reduce lint.
- Use rust-blocking metal primers on nails and bare steel.
- Keep drop cloths, painter’s tape, scrapers and a range of sandpaper (50–280 grit) handy.
If unsure, follow the paint manufacturer’s instructions. This saves time and ensures the coating works well under local conditions.
Techniques to ensure proper adhesion and a professional finish
Getting the surface ready is key for a smooth project. Clean off oil, wax, and dirt so the paint sticks well. Lightly scuff glossy spots to help the paint spread evenly.
Sanding and creating a smooth surface
Scrub areas where paint was removed to get rid of bumps. Start with rough sandpaper to smooth out edges. Then, switch to finer sandpaper, like 180–280 grit, for wood and trim.
Wipe away sanding dust with a brush and damp cloth before priming. This prevents poor paint adhesion. If a surface is glossy, lightly scuff it for better grip. Always degrease surfaces with oil or wax residue.
Application best practices
Start painting from top to bottom. Begin with large areas like walls or siding, then move to trim, windows, and details. This method avoids drips and ensures a smooth finish.
- Use angled brushes for trim and tight corners.
- Maintain a wet edge when rolling to prevent overlaps.
- Apply primer to bare spots and patched areas; use a tinted primer to cover darker colors.
Follow the manufacturer’s guidelines for wet film thickness and dry times. Let the first coat dry completely before applying the second. Two coats are usually needed for a durable and professional finish. When spraying, mask off surrounding areas carefully and test on scrap material to adjust pressure and tip size.
- Check the weather: avoid painting in high humidity, rain, or extreme temperature changes.
- Keep coat thickness even; a new coat should spread smoothly but not sag.
- Clean tools according to paint type—water for latex, solvent for oil—then dispose of waste per local South African regulations.
Always use safe ladder practices and wear protective gear while painting. Proper sanding, sensible application order, and patience between coats will help you achieve a smooth surface and a professional finish that lasts.
Dealing with common problems: peeling, flaking paint and mildew
When exterior paint fails, you’ll see peeling and flaking paint, along with dark mildew. Don’t paint over peeling paint without preparing it first. Assess the damage and plan safe removal and treatment. This way, your next coat will last longer in South Africa’s climate.

How to remove peeling and flaking paint
Start by using a scraper and medium-grit sandpaper to remove loose flakes. Keep going until you reach a solid base. If there are many layers, use controlled heat or abrasive methods for tough spots.
Chemical strippers are effective but need gloves, eye protection, and good air. They work well but be careful.
After removing the paint, smooth out the edges where wood or metal meets old paint. This helps the new paint stick better. Then, fill holes and gaps with exterior-grade filler, sand it smooth, and prime it.
Treat exposed nail heads with a metal primer to stop rust from showing through the paint.
Addressing mildew and stains
To clean mildew, mix one cup of household bleach with a gallon of water and a phosphate-free cleaner or TSP substitute. Rinse well and let it dry before painting. In humid or coastal areas, use paints with additives to fight mildew.
For stains like tannin bleed or rust, use a stain-blocking primer. For efflorescence on masonry, use a special cleaner and a masonry primer or sealer before painting. Fix leaks and ensure good drainage to prevent future problems.
- Scrape and sand to sound substrate before any repainting.
- Use safety gear with chemical strippers and power tools.
- Prime bare wood, metal, and repaired areas before topcoats.
- Choose mildew-resistant paints and water-repellent coatings for bare wood.
- Address stains with appropriate stain-blocking primers.
Surface-specific advice: wood, masonry, stucco and trim
Different exterior materials need different prep and paint choices. Follow specific steps to make your painted surfaces last longer. This is true in South Africa’s varied climate. Here are tips for wood and for masonry, stucco, and brick.
Painting exterior wood and wood trim
Begin by scraping off loose coating and sanding the wood trim to the right grit. Use 180 grit for exposed exterior wood and 280 grit for a smooth finish on trim. Clean with warm water and a TSP substitute, then let it dry.
If the wood is bare, seal it with a water-repellent preservative before priming. For cedar or redwood, use an oil-based primer. For most other species, an acrylic primer is best. Always prime raw areas to avoid tannin bleed and poor adhesion.
Brush application is best for wood trim, allowing for better paint penetration in joints. Choose semi-gloss or gloss for trim for easier cleaning. Apply at least two coats of quality exterior paint for durability.
Painting masonry, stucco and brick
Clean masonry, stucco, and brick with a pressure washer. Remove efflorescence and stains with masonry cleaners. Let walls dry completely to avoid paint failure and bubbling.
Use acrylic masonry primers or elastomeric coatings for walls with hairline cracks. Choose breathable coatings that let moisture migrate outward. Avoid oil-based paints on most masonry. Expect higher absorption on rough surfaces, so plan for extra paint.
Match tools to texture. Rollers with a longer nap or airless sprayers work best on rough stucco and brick. Caulk gaps around windows and doors after priming. Paint detail work with angled brushes and protect glass and hardware during the job.
Timing, weather and how long an exterior paint job lasts
Choosing the right moment for an exterior project is key. In South Africa, the best time to paint is during dry spells. This means steady daytime temperatures and low humidity. Early summer and early autumn are usually the best times for drying.
Best time and weather conditions to paint
Plan your work for when forecasts show several dry days. Avoid painting before rain or in high humidity. Always check the product label for the recommended temperature range to ensure adhesion.
Windy days can ruin wet paint by blowing grit into it. Cold nights after hot days can cause uneven curing. Aim for mild, stable conditions to help the paint set right.
Expected lifespan of exterior coatings
The lifespan of exterior paint depends on several factors. These include the surface type, prep quality, and local climate. Here are some typical lifespans:
- Wood siding: 3–7 years
- Stucco: 5–6 years
- Brick: 15–20 years
Using premium products and following recoat intervals can extend paint life. Regular inspections every few years help spot issues early. This includes cracking, peeling, mildew, or failed caulking.
Addressing problems quickly and doing targeted maintenance can extend paint life. Include routine touch-ups in your exterior project plans. This keeps coatings performing well.
Cost, time and when to hire professional painting contractors
Figuring out the cost and time for an exterior repaint is key. It helps you manage your budget and schedule. The cost depends on the area, height, and how easy it is to get to. Also, the prep work needed can greatly affect the total cost.
Estimating cost and project scope
To get a good estimate, break the job into parts. These include cleaning, scraping, repairs, primer, paint, and cleanup. Labour costs vary in South Africa, so get quotes from different painters. A small house will cost less, while a big one will cost more.
When making an estimate, consider these:
- Square footage and stories to access
- Extent of scraping, rot repair or stripping
- Scaffolding or specialised safety equipment
- Number of coats and brand of materials
- Local labour and warranty offerings
When to call professionals
Call professionals for big jobs like peeling paint, many old layers, or lead paint in old homes. They’re also best for hard-to-reach areas and for a top-quality finish.
Professional painters know how to prime and use sprayers. They also know about masking and the right order for painting. This saves time and avoids mistakes. When looking for painters, check their references, insurance, and if they’re affiliated with manufacturers. Ask for a detailed plan of work.
Make sure each painter gives you a written list of what they’ll do. This includes prep, coats, materials, and cleanup. A clear plan helps you decide if you should paint yourself or hire experts.
Conclusion
If you want to paint over old exterior paint, start by checking the surface. If the paint is in good shape, you can give your home a new look fast. First, clean the area, remove any loose paint, and fix any damage.
Then, use the right primer where needed. Pick high-quality exterior paint and primers to make your paint job last longer. Remember to sand glossy spots, follow the paint’s instructions, and apply at least two coats for a top-notch finish.
Don’t paint over peeling or flaking paint without removing it and fixing the surface. This will prevent your paint job from failing early. For tricky areas, high places, or if you think there’s lead paint, get professional painters who know South Africa’s weather and rules.